Are you ready to start your WordPress blog the right way?
Starting a blog might seem terrifying idea, especially if you’re not tech-savvy. But don’t worry – you’re not alone in this journey.
At NextWebPage, we’ve helped over 2 million+ users successfully create their own blogs, and now we’ve crafted this comprehensive, step-by-step guide to help beginners start a blog without any technical expertise.
In this detailed guide, we will walk you through the entire process, from setting up your blog to growing it effectively over time.

The process is simple and easy to apply, doesn’t matter whether you’re 20 or 60 years old. And if you need any assistance, our expert team is here to help you set up your blog or website professionally. → Click Here to Get Your Free WordPress Blog Setup! ←
What’s Needed to Set Up a WordPress Blog?
To create a WordPress blog, you’ll need three essential things:
1. A domain name (This will be the name of your blog, e.g., nextwebpage.com)
2. A web hosting account (This is where your website resides on the internet)
3. 30 minutes of your focused attention
Yes, you read that perfectly – you can start your new blog from scratch within 30 minutes, and here we’ll guide you through the entire process step by step.
In this tutorial, see what we will cover:
- Step 1. Pick Your Blog Name and Platform
- Step 2. Install WordPress Blogging Software
- Step 3. Selecting Your WordPress Theme
- Step 4. Creating Your First Blog Post
- Step 5. Plugins & Customizations
- Step 6. Making Money From Your Blog
- Step 7. Mastering WordPress
- Frequently Asked Questions (FAQs)
Ready? Let’s dive in.
Step 1. Pick Your Blog Name and Platform
One of the most common mistakes beginners make when starting a blog is choosing the wrong blogging platform. Fortunately, you’re here, so you won’t be making that mistake.
For 95% of users, it makes the most sense to use WordPress.org, also known as self-hosted WordPress.
Here’s why: WordPress is an open-source platform, which means it’s 100% free to use. You can install plugins, customize your blog’s design, and, most importantly, make money from your blog without any limitations (see the differences between WordPress.com vs. WordPress.org).
WordPress is also the number one platform used by all successful blogs, including ours. To put it in perspective, 43% of all websites on the internet use WordPress!
You might be wondering why WordPress is free. What’s the catch?
There is no catch. It’s free because you’ll need to handle the setup and hosting yourself.
In other words, you’ll need a domain name and web hosting.
A domain name is what users type in their browser to reach your website. It’s your blog’s address on the internet, like google.com or nextwebpage.com.
Web hosting is where your website’s files are stored. It’s your website’s home on the internet. Every blog needs web hosting.
Typically, a new domain name costs around $14.99/year, and web hosting plans start at $7.99/month.
That’s a significant amount for beginners just starting out.
Thankfully, Bluehost, an official WordPress-recommended hosting provider, has agreed to offer our users a free domain name along with a generous discount on web hosting.
You can also choose other popular WordPress hosting providers like SiteGround or Hostinger and still follow our blog setup tutorial.
We recommend Bluehost for beginners because it’s one of the oldest and most trusted web hosting companies on the internet. They’re also the largest brand in WordPress hosting, powering millions of websites, including many of our own.
Furthermore, Bluehost has been partnered with WordPress since 2005 and is committed to giving back to the community.
They’ve even promised us that if you can’t get your blog online within 30 minutes by following this guide, our expert team will do it for you at no cost. They’ll handle everything, and you won’t have to pay a dime. Contact us for free blog setup assistance.
NOTE: At NextWebPage, we believe in full transparency. If you sign up with Bluehost using our referral link, we’ll earn a small commission at no additional cost to you (in fact, you’ll save money and get a free domain). We could recommend any WordPress hosting provider, but we only endorse products that we personally use and believe will add value to our readers.
Let’s move forward and purchase your domain and hosting package.
Open up Bluehost in a new window and follow these steps.
The first step is to click on the green “Get Started Now” button to begin the process.

On the next page, you’ll be asked to choose a plan. The Basic and Choice Plus plans are the most popular options.
Next, you’ll need to enter the domain name you want for your website.

Finally, provide your account details and review your package options to complete the purchase. We recommend choosing the 12-month plan for the best value.
On this page, you’ll see optional add-ons that you can purchase. It’s entirely your choice to buy them now or later. We generally suggest waiting, as you can always add these extras later if needed.

Once your purchase is complete, you’ll receive an email with instructions on how to log in to your web hosting control panel (cPanel).
This is where you manage your website, including email support, FTP access, and, most importantly, WordPress installation.
Step 2: Installing WordPress on Your Blog
When you sign up with Bluehost through our link, WordPress will be automatically installed for you, allowing you to start building your blog immediately.
Just log in to your Bluehost account and click the “Login to WordPress” button to get started.

You can also access WordPress by visiting yoursite.com/wp-admin/ directly from your browser.
If you’re using a different WordPress hosting provider like SiteGround, Hostinger, or WP Engine, refer to our comprehensive guide on installing WordPress with those hosts.
Most hosting providers now auto-install WordPress, making it easy for non-techy users to start their blogging journey.
Once WordPress is set up, you’re ready to create your blog pages, customize the design, and start blogging.
Step 3: Choosing Your WordPress Theme
The visual design of your WordPress blog is determined by the theme you choose. Initially, your blog might look something like this:

This design is usually not very appealing.
Customizing your blog’s look and feel is one of the most exciting and rewarding parts of creating your WordPress blog.
There are thousands of pre-made WordPress themes available for you to install. These range from free themes to premium paid options.
To change your theme, navigate to your WordPress dashboard and click on Appearance » Themes.

Then, click on the “Add New Theme” button.
On the next screen, you can browse over 11,000 free WordPress themes available in the official WordPress.org theme directory. You can filter them by Popular, Latest, Block Themes, and other features like industry, layout, etc.

Hover over any theme to see a Preview button.
Clicking the Preview button will show you how the theme will look on your website.

The preview may not look exactly like the screenshot because you’ll customize it later.
Focus on the overall design, colors, typography, and other elements.
A good tip for selecting the perfect WordPress theme is to go for simplicity. This keeps your blog clean and easy to navigate while offering a great user experience.
If you need help selecting a theme, refer to our guide on what to consider when choosing the perfect WordPress theme.
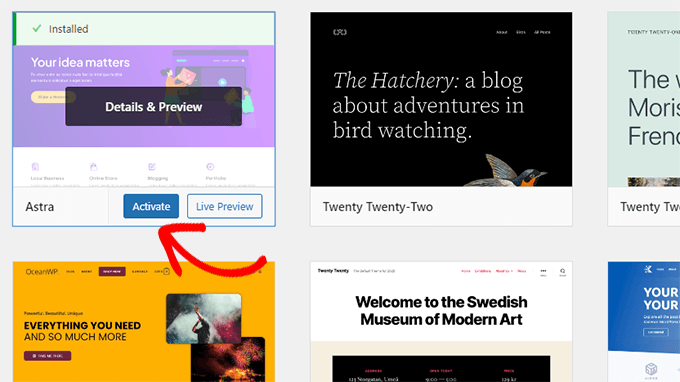
When you find a theme you like, hover over it, and you’ll see the Install button.
Click it to install the theme. After the installation, the Install button will change to Activate. Click Activate to enable the theme on your blog.
Once your theme is installed, you can customize it by clicking the Customize link under the Appearance menu.
Your chosen theme will have built-in widgets and customization options to help you tweak your blog design.

Note: If you don’t see the Customize link under the Appearance menu, it means you’re using a block theme. Block themes use the WordPress block editor for editing and customizing.
You can edit a block theme by visiting Appearance » Editor.

For even more design control, consider using a WordPress page builder like SeedProd or Divi. These tools allow you to create custom headers, footers, sidebars, and more without needing to write HTML code.
These plugins provide more design flexibility than platforms like Wix or Squarespace while giving you the full freedom of WordPress’s powerful content management system.

After selecting your WordPress theme, you’re ready to write your first blog post.
Step 4: Writing Your First Blog Post
To create your first blog post, click on the Posts » Add New menu in your WordPress dashboard.
You’ll see an editor area where you can begin writing.

WordPress uses a block-based editor that allows you to create beautiful content layouts for your blog posts.
To familiarize yourself with the editor, check out our WordPress block editor tutorial.
Once you’re finished writing, click the Publish button in the top-right corner of the screen to make your blog post live.

On the posts screen, you’ll see sections for Categories and Tags. These help you organize your blog posts into specific sections.
We have an in-depth guide on the difference between categories and tags, which we highly recommend you read.
To learn how to use all the features on the posts screen, check out our article on how to add a new post in WordPress, which includes a video tutorial.
This guide covers how to embed videos, add blog images, create headings, tables of contents, sub-headers, bullet lists, call-to-action buttons, social media posts, and other essential shortcuts.
Beginners often get confused between the Posts and Pages menus in WordPress. That’s why we’ve written a complete guide on the differences between posts and pages.
If you’re struggling to come up with new blog post ideas, here are some helpful resources:
- Free blog post idea generator tool by NextWebPage
- 103 blog post ideas your readers will love
- 73 types of blog topics proven to work
- How to write a great blog post (structure + examples)
- How to create an effective content plan in WordPress
Many pro bloggers strategically choose their topics through keyword research. This helps their content rank higher in Google search results, leading to more traffic.
We have a step-by-step guide on how to do keyword research for beginners using the exact methods we use on NextWebPage.
Step 5: Plugins & Customizations
After writing your first blog post, you may want to add other elements to your website, such as a contact page, galleries, sliders, email lists, and forums.
To add these features, you’ll need to use plugins.
Plugins are like apps for your WordPress site, enabling you to add new functionality without writing any code.
There are over 59,000 WordPress plugins available in the free WordPress plugin directory. This means there’s a plugin for nearly anything you want to achieve.
We have a step-by-step guide on how to install a WordPress plugin.
Now, let’s look at how to use plugins to add essential features to your WordPress blog.
How to Create a Contact Form in WordPress
Every website needs a contact form, allowing users to email you directly. Since WordPress doesn’t include a built-in contact form, you’ll need a form builder plugin to add one to your site.
We recommend using the WPForms Lite plugin. It’s the free version of the popular WPForms plugin, which ranks #1 in our list of best contact form plugins for WordPress.
Over 6 million websites use WPForms!
You can install the plugin by going to the Plugins » Add New page and typing “WPForms” in the search box. Click “Install” and then “Activate.” After activation, go to the WPForms » Add New page to create your first form.

This will open the WPForms builder interface.
First, name your contact form and select the ‘Simple Contact Form’ template.

WPForms will now create a basic contact form with all the necessary fields.
You can click on any field to modify it or add a new field from the left column.

Once you’re done editing, click the save button at the top right corner and exit the form builder.
Now, create a new page in WordPress by going to Pages » Add New Page and name it ‘Contact.’
On the edit screen, add the WPForms block to the editor.

Then, select the form you created earlier from the drop-down menu.
WPForms will load a live preview of the form in the editor.

You can now save and publish the page and visit it in your browser to see your contact form in action.
It’s a good idea to test your form to ensure you’re receiving notifications. If you’re not getting notifications, check out our guide on how to fix WordPress not sending emails.
For more detailed instructions, see our step-by-step guide on how to create a contact form in WordPress.
As a blogger, WPForms grows with you. Beyond simple contact forms, you can use it to create surveys, polls, guest post submission forms, and more.
How to Set Up Google Analytics Tracking
Google Analytics helps you track your blog’s visitors, see where they’re coming from, and understand what they’re doing on your site.
It’s best to set up Google Analytics when you start your blog, so you can track its growth over time.
First, visit the Google Analytics website and sign in with your Gmail account.
After logging in, sign up for a free Google Analytics account.

You’ll be asked to provide your details and website URL. Then, you’ll receive your Google Analytics tracking code.
You can stop here, as we’ll use a plugin to automatically fetch and add this.
Step 6: How to Monetize Your Blog and Make Money Online
Now that you’ve successfully set up and customized your blog, you’re probably wondering how to start earning money from it. There are several effective strategies to monetize your blog, but remember, there’s no such thing as an overnight success. Genuine success requires hard work and dedication.
Unlike other “get-rich-quick” schemes, we provide a thorough guide on how to generate revenue from your WordPress blog. This comprehensive 4000+ word guide includes insights from over 15 years of online experience. By following these methods, you’ll be well on your way to turning your blog into a profitable venture.
1. Monetize Your Blog with Google AdSense

One popular way to monetize a blog is through Google AdSense. This leading advertising platform connects you with advertisers who bid on keywords related to your content. As a result, you receive competitive ad rates and earn money when visitors interact with these ads.
For detailed instructions on integrating Google AdSense with your WordPress blog, check out our guide on setting up Google AdSense.
2. Generate Income with Affiliate Marketing

Affiliate marketing is another effective monetization strategy for bloggers. By recommending products or services you trust, you earn a commission when readers make a purchase through your referral links.
To maximize your earnings, utilize affiliate marketing plugins like Pretty Links or ThirstyAffiliates. These tools help you manage and optimize your affiliate links.
For a comprehensive guide on getting started with affiliate marketing, including choosing the right programs and strategies, refer to our step-by-step affiliate marketing guide.
3. Create an Online Store

Selling products directly from your blog is a great way to generate revenue. Whether you’re offering physical goods or digital downloads such as eBooks, music, or artwork, there are several tools available to help.
For digital product sales, we recommend using Easy Digital Downloads, a plugin that simplifies selling digital products. If you plan to sell physical products, WooCommerce is the best eCommerce plugin for WordPress, offering extensive features and ease of use.
For a guide on setting up an online store with WordPress, see our detailed tutorial.
Alternatively, consider creating an Amazon affiliate store to earn commissions by selling products from Amazon’s marketplace.
Explore various blog types, including review blogs, fashion blogs, or food blogs with recipes, to find unique opportunities for monetization. You can also transform your blog into a membership site offering exclusive content and online courses. Our guide on creating and selling online courses with WordPress will help you get started.
Step 7: Mastering WordPress
[space for image]
At NextWebPage, we provide extensive resources to help you master WordPress. Our goal is to offer clear and practical WordPress tutorials for beginners, small businesses, and non-tech-savvy users.
To enhance your WordPress skills, explore the following resources:
- NextWebPage Professionals – A beginner-friendly experts are always ready to help you understand WordPress terminology.
- NextWebPage Blog – Our central hub for all WordPress tutorials and guides.
Join our free Facebook group, NextWebPage Engage, with over 97,000 members, to connect with other beginners and get answers to your WordPress questions.
Subscribe to the NextWebPage E-mail Newsletters for regular blog tutorials on WordPress. For specific questions, you can use Google with “NextWebPage” for quick answers, or contact us directly via our support form. Our dedicated support team is here to help you succeed with WordPress.
Frequently Asked Questions (FAQs) About Blogging
Having assisted thousands in starting their blogs, we’ve compiled answers to the most common questions about creating and managing a blog. Here’s everything you need to know:
Can I Create a Blog Without Using WordPress?
Yes, there are various blogging platforms available beyond WordPress. However, based on our extensive comparisons, WordPress remains the top choice for bloggers who seek complete ownership and flexibility. It’s the best website builder for creating a blog with full control over your content and design.
Is It Possible to Build a Blog Without Web Hosting?
No, web hosting is essential for storing your website files. Every blog requires web hosting to function. To start a blog, you’ll need both a domain name and web hosting service.
Is It Free to Start a Blog on WordPress?
WordPress itself is free to use. However, you’ll need to purchase hosting and a domain name to have a fully functional blog. Alternatively, you can start with a free blog on WordPress.com, though it comes with limitations compared to a self-hosted WordPress.org site.
How Do I Choose a Good Name for My Blog?
Choosing a compelling blog name is crucial. Many personal blogs use the creator’s name, while others reflect the blog’s topic or niche. To generate blog name ideas, try using our AI-powered business name generator.
What Is the Best Niche for Blogging?
Selecting the right blogging niche helps in creating engaging content and maximizing your income potential. Our experts have identified the top 7 blogging niches that are ideal for starting a successful blog. Additionally, explore our list of the 18 most popular blog types for inspiration.
How Much Does It Cost to Start a Blog?
The cost varies depending on the tools and services you choose. We have a comprehensive guide detailing the costs associated with a WordPress website and tips for saving money. Many blogging tools are either free or offer a 30-day money-back guarantee.
Can I Start a Blog Without My Parents Knowing?
Yes, you can keep your WordPress blog private and hidden from the public. Follow our step-by-step guide to make your WordPress blog completely private.
Can I Make Money with Google AdSense on My WordPress Blog?
Yes, you can monetize your WordPress blog with Google AdSense. We provide a detailed guide on how to integrate Google AdSense into your WordPress site.
How Can I Blog Anonymously?
To maintain anonymity while blogging, ensure your domain has WHOIS privacy protection. Use a pseudonym for writing and create a dedicated email for your blog. Avoid sharing personal photos or identifying information. For more on anonymous blogging, see our article on blogging anonymously with WordPress.
How Do I Add a Podcast to My WordPress Blog?
Adding a podcast to your WordPress blog is straightforward. Our step-by-step guide will help you get started with podcasting on WordPress.
Can I Create a Blog in a Different Language?
Yes, WordPress supports multiple languages. You can select your preferred language during installation or from the Settings page. WordPress is fully translated into over 56 languages and partially into many others. Many themes and plugins also support multiple languages. You can also translate a theme or plugin to match your needs.
How Do I Create a Multilingual Blog?
To create a multilingual blog in languages like Hindi or Spanish, follow our step-by-step guide on building a multilingual website with WordPress.
Can I Design a Blog Without Coding Skills?
Absolutely. You don’t need coding or design skills to create a professional-looking blog. WordPress themes like Astra offer ready-made starter sites that you can import with one click. Themes like Divi provide drag-and-drop design options, and page builders such as SeedProd and Divi Builder allow you to customize your blog with ease. You can even create a custom theme without writing code.
Can I Add a Photography Gallery to My Blog?
Yes, WordPress includes a built-in gallery feature for adding photo galleries to your posts. For enhanced functionality, professional photographers can use premium gallery plugins to showcase and sell their photos.
How Can I Create a Professional Email Address for My Blog?
For a serious blogging venture, a professional business email address is recommended. It’s a free and essential tool for standing out and forging better partnerships.
Can I Switch Blogging Platforms Later?
If you’ve started with a less suitable platform like Medium, Tumblr, or Blogger, switching to WordPress is straightforward. We offer detailed tutorials on migrating from:
- Medium to WordPress
- Blogger to WordPress
- WordPress.com to WordPress.org
Where Can I Find High-Quality Photos for My Blog?
Great blogs often feature high-quality images. Our beginner’s guide will help you find royalty-free stock photos for your blog posts, videos, and social media.


Add comment